

Editor’s Note: This blog post is part of our team’s “Kitchen Tricks & Slips” series, where we offer suggestions on recipe modifications, helpful tips, and real-life challenges so you can avoid similar messes in your cooking experiments. As any recipe only offers guidance, not guaranteed results, we encourage you to play with these recipes, too, and find what works best for you. We’d love to hear what you cook up!
Making my own almond milk has long been on my to-do list. We’ve shared simple recipes previously and I always thought, Gee whiz, I should give that a shot! I figured it would save money, and I would know exactly what was in my nut milk — no additives, sugars, or other funky stabilizers.
In the past year or so, some companies have started reformulating their nut milks to remove the thickener carrageenan (read about it in “Carrageenan Concerns”), which has been linked to gastrointestinal inflammation and abnormal growths in the colon in animal studies.
Removing carrageenan is better, yes, but, if you’re trying to avoid sugar, you’ll still find the sweetener or sugar substitutes in many commercial brands. This was news to me, which I discovered recently while I was following the Whole30 program.
So I tried making my own by following our “How to Make Your Own Nut Milk” story, and I can report: Yes! It really is that easy.
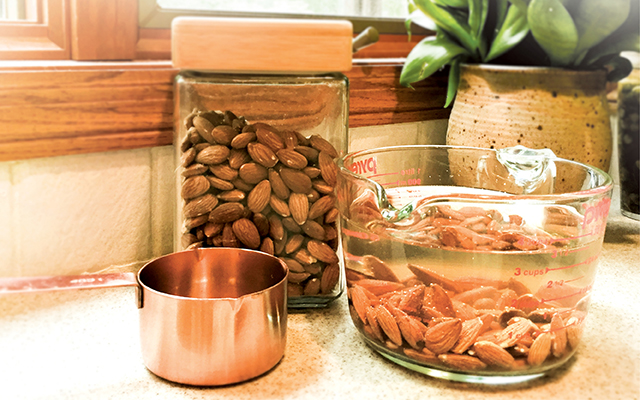
The recipe we feature (3 cups water to 1 cup soaked unsalted, raw almonds) produced enough milk for about four to five days. I sealed it up in this great Weck glass carafe.
I was able to use a splash or two in my daily pseudo-Bulletproof coffees (sans butter for Whole30, since dairy isn’t approved; I could have added Whole30-compliant ghee/clarified butter, but I was too lazy to add it). There was also enough for four Quick-Trick Snack Stacks, with some left over for a smoothie, too.
Helpful DIY Almond Milk Tips
I added these must-dos to my process that I hope you’ll find helpful:
- Use a cheesecloth or nut-milk bag to strain. I used just a mesh strainer the first time and had chunks of blended nuts in my milk. Not great. The cheesecloth layered inside the strainer made a world of difference: You can bundle and squeeze the cloth to get more milk, too. Wash, dry, and reuse.
- Start soaking your almonds the night before, ideally at dinnertime. If you want fresh nut milk in the morning, allowing the almonds to soak for a minimum of 12 hours is key. (If it’s a bit longer, that’s fine.) I found the best time to start soaking was Saturday night, so I was able to whip up a batch on Sunday for the week ahead.
- The leftovers are almond pulp, which is full of fiber. You can use it wet or dry, similar to almond meal or flour. (The difference between the meal and flour is that the flour has the skins removed from blanched almonds and is often finer ground.) If you’ve been wanting to try out a new paleo bread recipe but are hesitant to buy an entire bag of almond flour, you can take the wet almond meal that’s leftover after you’ve made your milk, and bake it on parchment paper in 200-degree-F oven for a few hours to make your own flour. Grind further for a smoother texture. Or, for the wet almond meal, add it to smoothies, oatmeal, granola, or yogurt when you’d like a little extra protein. It freezes well in small batches for later use. The meal also works well as a substitute for breadcrumbs as a topping, or as a crust for fish, chicken, or pork. You can also use the pulp in protein balls.
Have you been making homemade almond milk? What tricks have you learned? Share it with us on Twitter at @ExperienceLife, or in the comments section below.
Find more recipes for almonds in “Almond Joy.”
This Post Has 0 Comments