


Powerbuilding combines the strength-building focus of powerlifting — a sport that focuses on squatting, benching, and deadlifting maximal weight — with the muscle-sculpting principles of bodybuilding, which emphasizes accessory lifts to strengthen and shape even the smallest muscles.
This twist on traditional hypertrophy, or muscle-building, training delivers results that appeal to off-season athletes and everyday exercisers alike: a body that is strong and balanced inside and out.
“Combining the total-body strengthening potential of the squat, bench press, and deadlift with the set-and-rep scheme typical to bodybuilding movements allows you to see strength gains while simultaneously building a balanced physique,” says Marisa Inda, world-record-holding powerlifter and Juggernaut Training Systems strength coach.
Powerbuilding workouts begin with compound, multijoint lifts, such as the squat, bench press, or deadlift. These are followed by simpler, less-taxing exercises that target the same muscle groups.
In these workouts, you won’t be aiming to lift the most weight possible; instead, you’ll hoist lighter weights for more reps, with less rest time than you might be used to, explains Inda. In other words, “you can complete more total work in the same or less time of your typical workout,” she says.
When you overload your muscles in this way, your body will work hard to adapt to the workouts — and that adaptation is what creates significant, visible changes in your strength and physique.
The Program
This eight-week powerbuilding program is broken into two four-week phases. You will be training three days each week, with each session lasting about an hour.
Each training day begins with a main lift: squat, bench press, or deadlift. This will be followed by accessory exercises that target the same muscle groups.
Choose challenging weights that you can lift with good form for the prescribed number of sets and reps. Increase weight as often as possible, without compromising these standards.
Phase I: Weeks 1-4
Perform each numbered day once per week, for a total of three workouts each week.
Exercise A: Perform as a straight set for three sets of eight to 10 reps. Rest 60 to 90 seconds between sets.
Exercises B1, B2, B3: Perform as a circuit for three sets of 10 to 12 reps. Rest 30 seconds between sets.
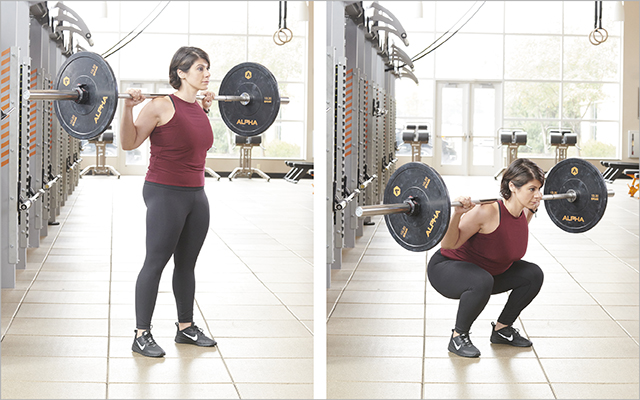
Day 1: Squat Day
A: Barbell Back Squat
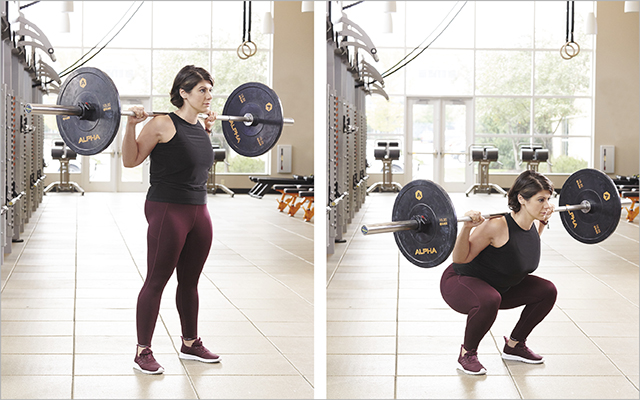 Photos: Kelly Loverud; Styling: Pam Brand; Fitness Model: Maggie Fazeli Fard
- Inside a squat rack, position the bar on your upper traps, just below the bony part of the back of your neck.
- Positioned directly under the bar, stand up with the weight and then, taking small steps, back up until you’ve cleared the hooks.
- Initiate the squat by pushing your butt backward and bending your knees.
- Keeping your torso upright, your spine neutral, and your knees in line with your toes, lower yourself as far as you are comfortably able. (If it’s not far, adjust your foot position and try turning your toes slightly outward, but don’t go farther than is comfortable.)
- As you descend, keep your knees tracking in the same direction as your feet, then push off the floor to stand to a full lockout.
- Return to the starting position and repeat.
For additional form tips, check out “Break It Down: The Squat.”
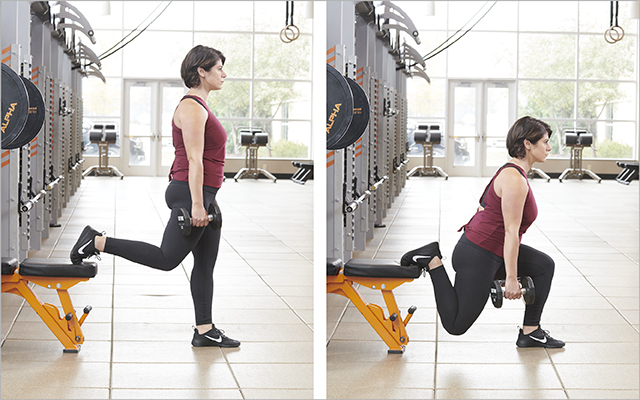
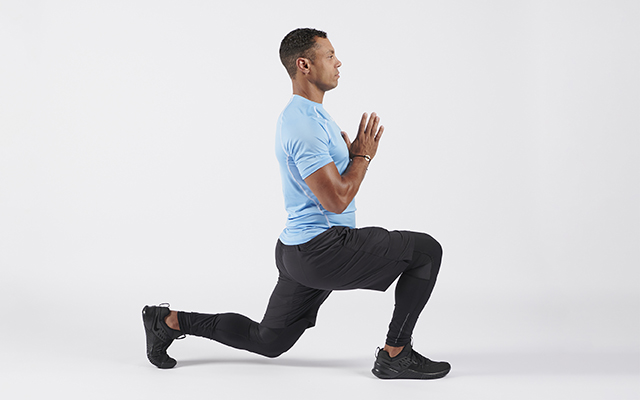
B1: Dumbbell Reverse Lunge
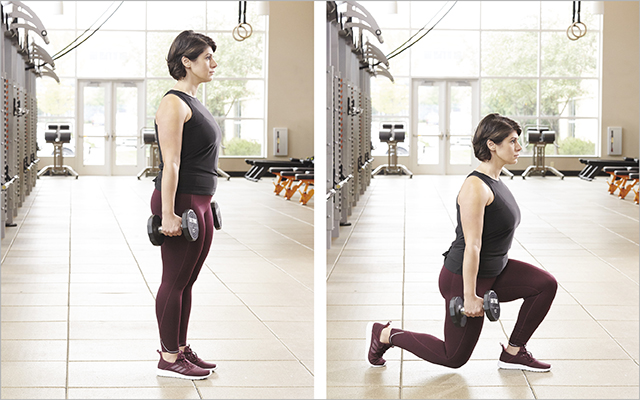 Photos: Kelly Loverud; Styling: Pam Brand; Fitness Model: Maggie Fazeli Fard
- Stand tall while holding two dumbbells at your sides, then take a large step backward with one leg. Lower your hips as far as you can control.
- Return to standing by pulling your body up with your front leg, driving through your heel and bringing the back foot forward.
- Complete all repetitions on one side before moving on to the other.
For additional form tips, check out “Break It Down: The Lunge.”
B2: Dumbbell Single-Leg Calf Raise
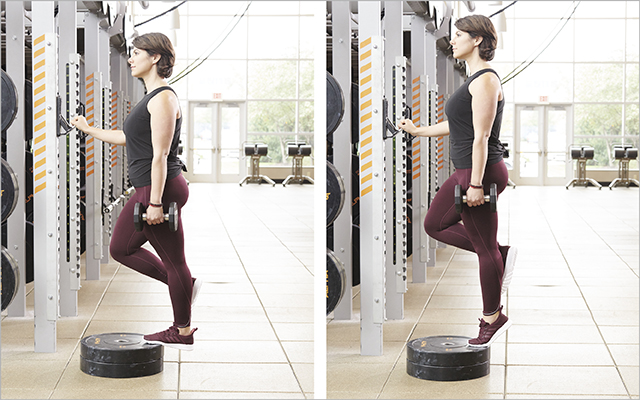 Photos: Kelly Loverud; Styling: Pam Brand; Fitness Model: Maggie Fazeli Fard
- Stand with one foot on an elevated surface, grasping the wall or a rack for balance.
- While holding a dumbbell in the same-side arm as the working leg, contract your calves and push the ball of your foot into the elevated surface to rise up onto your toes, rolling onto your big toe as you squeeze.
- Slowly lower your heel back down to the ground, and repeat.
For additional form tips, check out “Break It Down: The Calf Raise.”
Day 2: Bench Day
A: Barbell Bench Press
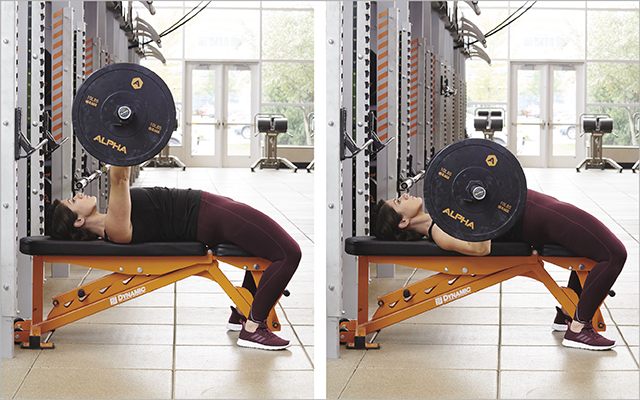 Photos: Kelly Loverud; Styling: Pam Brand; Fitness Model: Maggie Fazeli Fard
- With either a full squat rack or bench-press-specific bench and rack, set the barbell at an appropriate height so you can unload the bar from the hooks while lying down on a flat bench.
- While seated, set your feet, then lie back so your shoulders and head are on the bench. Allow your upper back to arch away from the bench as you squeeze your glutes and brace your abs to protect your lower back.
- Take a wide grasp on the bar so your wrists are stacked over your elbows in the bottom position (bar rested on your chest). It may take a few sets to get this right.
- Unrack the bar from the hooks. Pull the bar down to your chest, directly across the nipple line or slightly below the sternum. Your shoulders should not hike up in this position.
- Eliminate any bouncing or heaving off the chest by bringing the bar to a half-second standstill on your chest before you initiate the press.
- After a brief pause, press the bar back over your chest. The bar path should be straight and stable in each rep and through the entire set.
- Keep your feet on the floor, and your butt, shoulders, and head all in contact with the bench. If you cannot comfortably plant your entire foot on the floor, use a box or plates next to the bottom of the bench as risers for your feet. Repeat.
For additional form tips, check out “Break It Down: The Bench Press.”
B1: Hands-Elevated Pushup
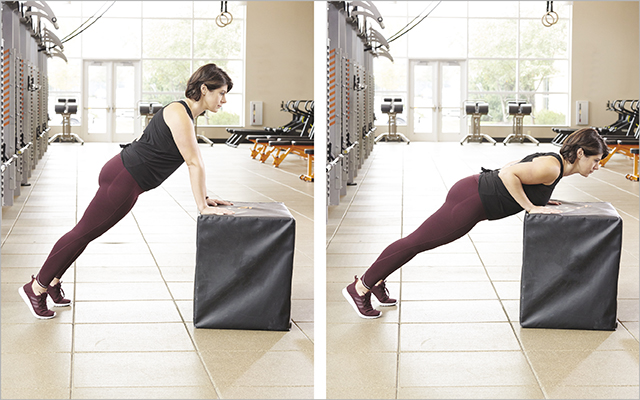 Photos: Kelly Loverud; Styling: Pam Brand; Fitness Model: Maggie Fazeli Fard
- Face an elevated surface such as a box or bench in a straight-arm plank position with your body elevated between your hands and toes. Line up your hands directly under your shoulders, just wider than your rib cage on a box, bench, or barbell at a suitable height.
- With a stiff core and squeezed glutes, lower your body down as far as you can control, angling your elbows out no more than 45 degrees. Don’t let your lower back sag.
- Press into your hands to return to the starting plank position. Repeat.
- Scale the intensity back by elevating your hands onto a higher step, box, or railing, or make it harder by using a lower surface.
For additional form tips, check out “Break It Down: The Pushup.”
B2: Dumbbell Lateral Raise
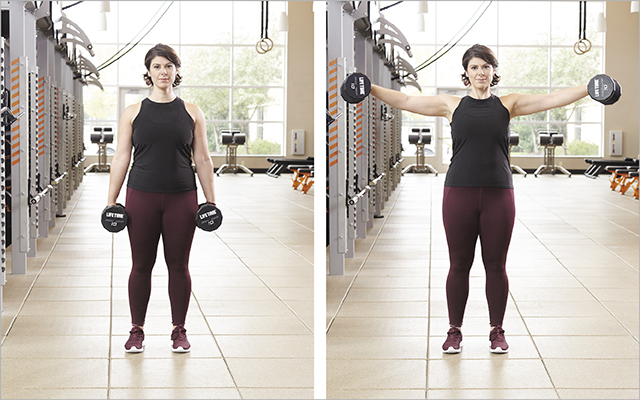 Photos: Kelly Loverud; Styling: Pam Brand; Fitness Model: Maggie Fazeli Fard
- Stand tall and grasp two dumbbells so they are hanging down and resting against the outsides of your thighs.
- Keeping your arms straight, raise the dumbbells out to your sides until your arms are parallel to the floor.
- With control, lower your arms until the dumbbells reach your thighs.
- Repeat.
(For more on the lateral raise, and variations to the move, see “BREAK IT DOWN: The Lateral Raise.”
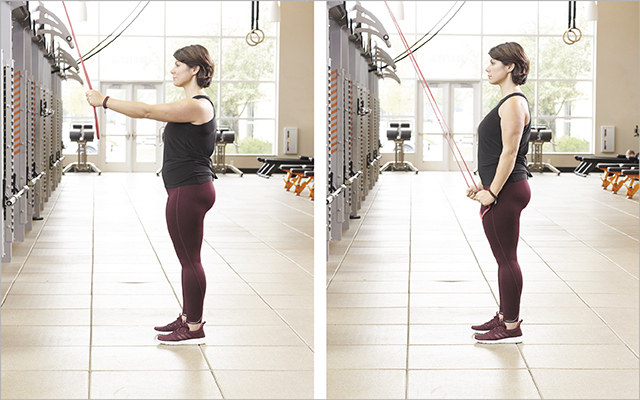
B3: Resistance-Band Triceps Pushdown
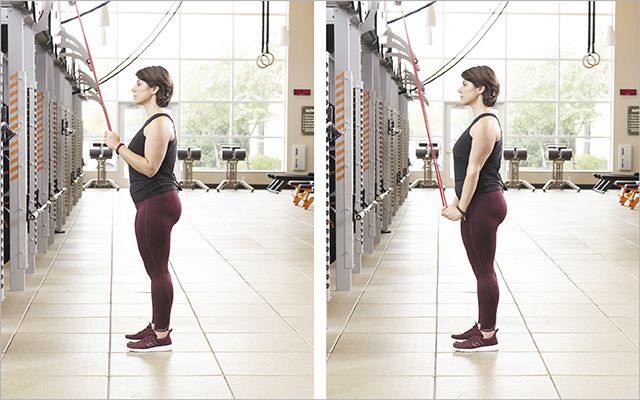 Photos: Kelly Loverud; Styling: Pam Brand; Fitness Model: Maggie Fazeli Fard
- Anchor a resistance band to a rack or other sturdy fixture in an overhead position.
- Standing tall and slightly behind the anchor point, grasp the lower part of the resistance band with bent arms, and draw it down close to your chest.
- Keeping your elbows tucked to your rib cage, press the band down toward the ground, spreading your hands slightly apart and squeezing your triceps.
- Slowly allow the band back up to the starting position, and repeat.
Day 3: Deadlift Day
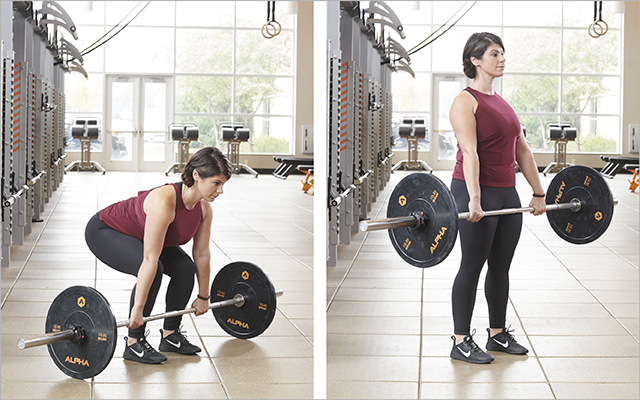
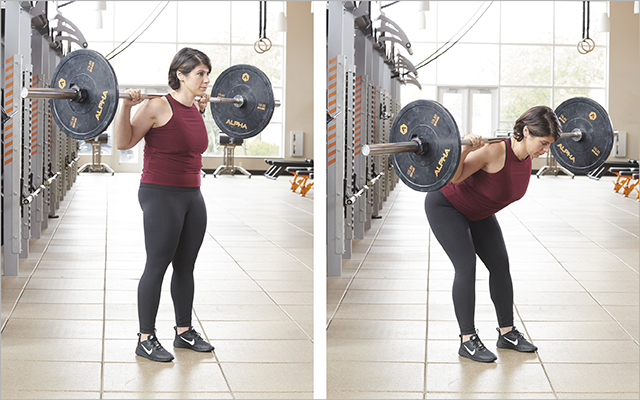
A: Barbell Deadlift
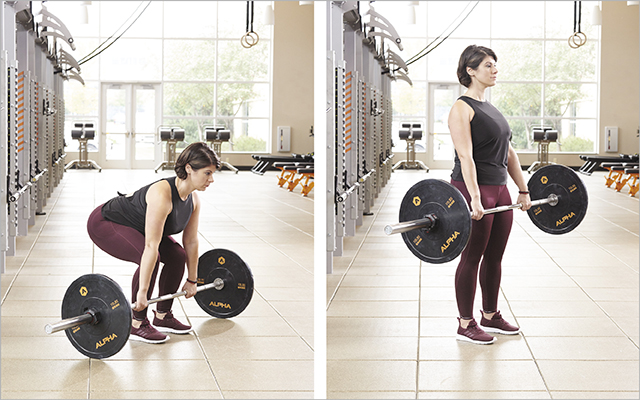 Photos: Kelly Loverud; Styling: Pam Brand; Fitness Model: Maggie Fazeli Fard
- Assuming a shoulder-width stance, feet pointing straight forward or slightly outward, step up to the bar so that your shins are touching the bar. From this point on, the bar should remain in contact with your body. Your shins should be vertical.
- Hinge at the hips and push your butt back as far as you easily can.
- At this point, your hands should be only a few inches from the bar. Bend slightly at the knees until you can grasp the bar.
- With your hands just outside of your legs, grip the bar with a double-overhand grip (both palms facing toward you). This is the grip you will use until the weight is so heavy you feel like your hands will slip off; then you can switch to a mixed grip, if you wish.
- Take a breath.
- Get your chest up — someone across the room should be able to read the front of your shirt.
- Push the floor away and stand up with the weight. Exhale as you stand tall with your shoulders back and your chest up at lockout. Your hips should not shoot up before the bar leaves the floor. If the hips move, the bar should move. Repeat.
For additional form tips, check out “Break It Down: The Deadlift.”
B1: Resistance-Band Straight-Arm Pulldown
 Photos: Kelly Loverud; Styling: Pam Brand; Fitness Model: Maggie Fazeli Fard
- Loop a large resistance band around a pull-up bar so it hangs freely overhead.
- Stand and grab the resistance band with both hands, arms straight out in front of you. There should be no slack in the resistance band while in the starting position.
- Keeping your hips directly under your rib cage and your core lightly braced, pull the band down to the front of your thighs.
- Bring your arms back up to the starting position slowly, and again, keep your hips directly under your rib cage throughout the movement. Repeat.
- To make the movement more difficult, “choke up” on the resistance band for more resistance as you pull the band downward.
B2: Dumbbell Romanian Deadlift
 Photos: Kelly Loverud; Styling: Pam Brand; Fitness Model: Maggie Fazeli Fard
- Stand tall and grasp one dumbbell so it hangs down in front of you against your thigh.
- Keeping your chest up, hinge at the hips and allow the dumbbell to trail down the front of your leg, keeping it as close to your body as possible.
- When you reach the end of the range of motion — typically felt as a stretch in the hamstrings or a change in back position — reverse the movement and stand up. Repeat.
For additional form tips, check out: “Break It Down: The Romanian Deadlift.”
B3: Body-Weight Leg Lower
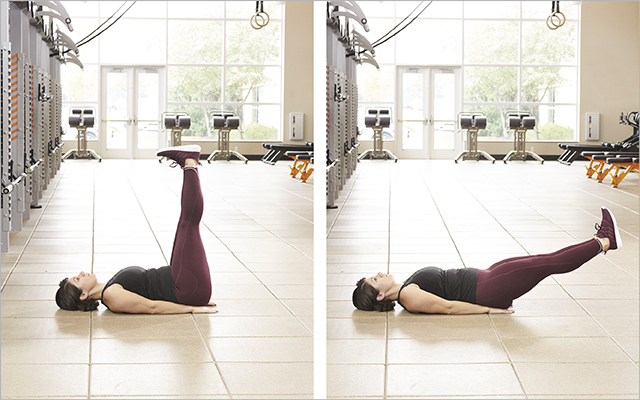 Photos: Kelly Loverud; Styling: Pam Brand; Fitness Model: Maggie Fazeli Fard
- Lie on your back, hands at your sides and palms facing the floor.
- Lift your legs straight into the air so your soles are facing the ceiling.
- “Imprint” your lower back into the floor by imagining that you are trying to squish grapes.
- Slowly lower your legs while keeping your lower back stable and pressing against the floor. Repeat.
- If the movement feels taxing on your lower back, shorten the range of motion (lowering your legs only partway) and slightly bend your knees.
Phase II: Weeks 5 to 8
Please complete Phase I: Weeks 1 to 4 of this program prior to beginning Phase II. Perform each numbered day once per week, for a total of three workouts each week.
Exercise A: Perform as a straight set for four sets of six to eight reps. Rest 60 to 90 seconds between sets.
Exercises B1, B2, B3: Perform three sets of eight to 10 reps. Rest 30 seconds between sets.
Day 1: Squat Day
A: Barbell Back Squat
 Photos: Kelly Loverud; Styling: Pam Brand; Fitness Model: Maggie Fazeli Fard
- Inside of a squat rack, position the bar on your upper traps, just below the bony part of the back of your neck.
- Standing directly under the bar, stand up with the weight, and then, taking small steps, back up until you’ve cleared the hooks.
- Initiate the squat by pushing your butt backward and bending your knees.
- Keeping your torso upright, your spine neutral, and your knees in line with your toes, lower yourself as far as you are comfortably able. (If it’s not very far, adjust your foot position and try turning your toes slightly outward, but don’t go farther than is comfortable.)
- As you descend, keep your knees tracking in the same direction as your feet, then push off the floor to stand to a full lockout.
- Return to the starting position and repeat.
For additional form tips, check out “Break It Down: The Squat.”
B1: Dumbbell Bulgarian Split Squat
 Photos: Kelly Loverud; Styling: Pam Brand; Fitness Model: Maggie Fazeli Fard
- Hold a pair of dumbbells at your sides and stand facing away from a bench, box, or step.
- Depending on your flexibility and the height of the elevated surface, reach one foot back and rest either the top of your foot or the ball of your foot on the bench.
- While keeping the chest up (but not necessarily completely vertical), squat down on your front leg, keeping your knee in line with your foot. Push away from the floor to return to your starting position, and repeat.
- If you can’t keep your front heel down or if you feel cramped for space with the box behind you, move your front foot farther away from the box (step down and then reposition your front foot, or hop forward very, very carefully).
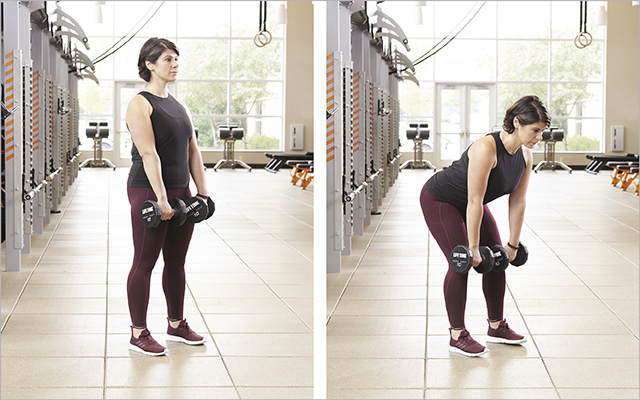
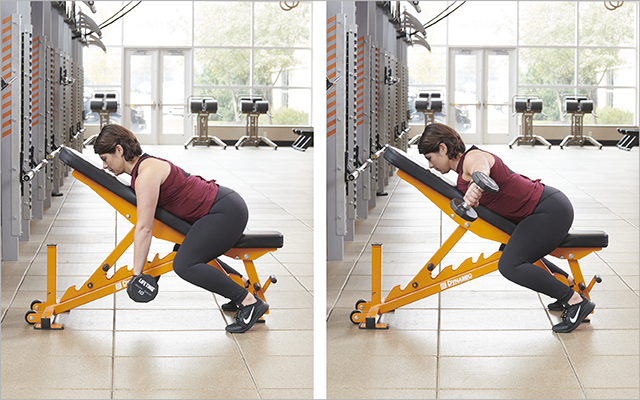
B2: Dumbbell One-Armed Bent-Over Row
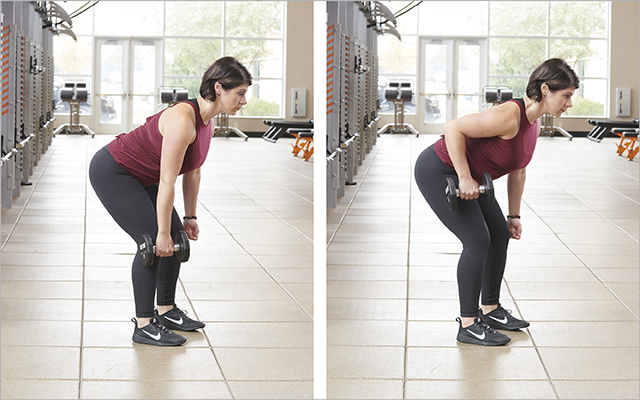 Photos: Kelly Loverud; Styling: Pam Brand; Fitness Model: Maggie Fazeli Fard
- Holding a dumbbell at your side, hinge forward from the hips approximately 45 degrees while staying wide across the chest.
- Row the dumbbell up toward your rib cage, keeping your elbow no more than 30 degrees out from your body.
- Keep your shoulders down and away from your ears.
- Lower the dumbbell to the start position with control, and repeat.
B3: Body-Weight Plank
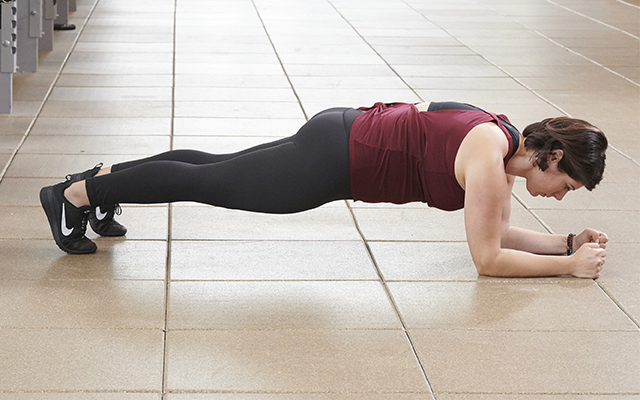 Photos: Kelly Loverud; Styling: Pam Brand; Fitness Model: Maggie Fazeli Fard
- Lie on your stomach with your elbows directly under your shoulders.
- Raise your body so that only your forearms and balls of the feet are in contact with the floor.
- Keep your midsection tight and squeeze your glutes throughout, so your body forms a straight line from head to heels.
- Hold for as long as you can maintain good form, or about 30 seconds.
Day 2: Bench Day
A: Barbell Bench Press
 Photos: Kelly Loverud; Styling: Pam Brand; Fitness Model: Maggie Fazeli Fard
- With either a full squat rack or bench-press-specific bench and rack, have the barbell at an appropriate height so you can unload the bar from the hooks while lying down on a flat bench.
- While seated, set your feet, then lie back so your shoulders and head are on the bench. Allow your upper back to arch away from the bench as you squeeze your glutes and brace your abs to protect your lower back.
- Take a wide enough grasp on the bar so that your wrists are stacked over your elbows in the bottom position (bar rested on your chest). It may take a few sets to get this right.
- Unrack the bar from the hooks. Pull the bar down to your chest, directly across the nipple line or slightly below the sternum. Your shoulders should not hike up in this position.
- Eliminate any bouncing or heaving off the chest by bringing the bar to a half-second standstill on your chest before you initiate the press.
- After a brief pause, press the bar back over your chest. The bar path should be straight and stable in each rep and throughout the entire set.
- Keep your feet, butt, shoulders, and head all in contact with the bench and ground. If you cannot comfortably plant your entire foot on the floor, use a box or plates next to the bottom of the bench as risers for your feet.
- Repeat.
For additional form tips, check out “Break It Down: The Bench Press.”
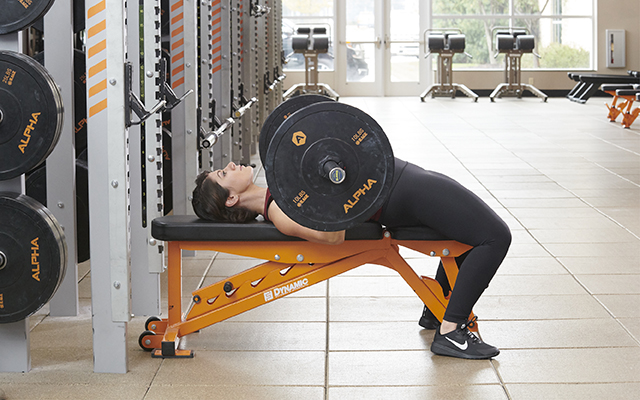
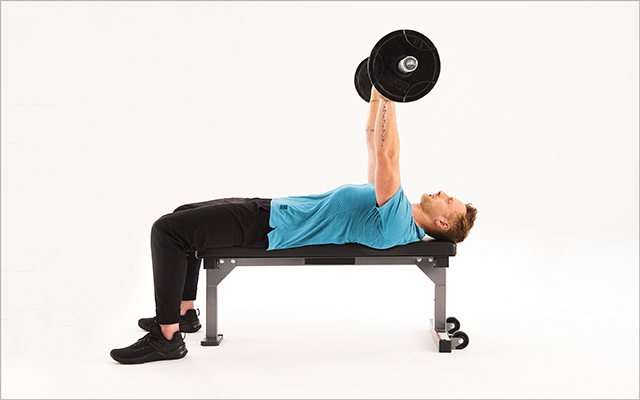
B1: Dumbbell Incline Bench Press
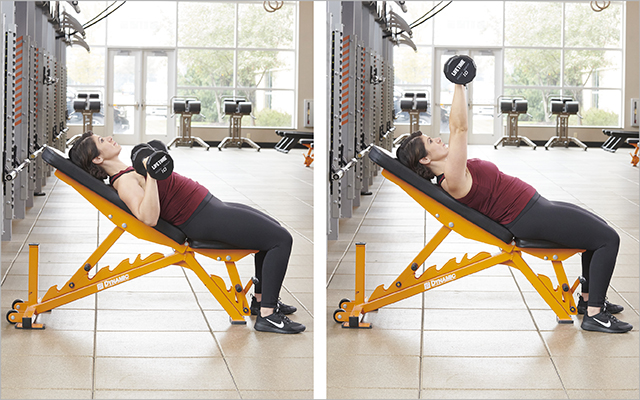 Photos: Kelly Loverud; Styling: Pam Brand; Fitness Model: Maggie Fazeli Fard
- Use either an inclined-bench-press-specific bench or elevate one end of a freestanding bench with two 45-pound bumper plates or a small box. The bench should be inclined approximately 15 degrees.
- Sitting on the lower end of the bench, hold two dumbbells in front of you, resting them against your thighs.
- Lie back, bringing the dumbbells to the bottom position of the bench press at the sides of your chest. Press your feet into the floor and arrange your hands in the most comfortable position for you — palms facing either in (neutral grip) or down toward your feet.
- Press the weight straight up over your chest until your arms are fully extended above your sternum.
- Lower the dumbbells completely and with control, then immediately press them back up. Repeat.
B2: Dumbbell Chest-Supported Reverse Fly
 Photos: Kelly Loverud; Styling: Pam Brand; Fitness Model: Maggie Fazeli Fard
- Holding two dumbbells, elbows slightly bent, lie face-down on an incline bench.
- Turn your grip inward and, leading with your pinkies, lift the weight out to the side, trying to spread your shoulder blades apart as you lift — think of letting your arms hang off of your body throughout the movement.
- Keep your back neutral and shoulders away from your ears.
- Lower the weight with control back to the starting position.
- Repeat.
B3: Dumbbell Seated Overhead Triceps Extension
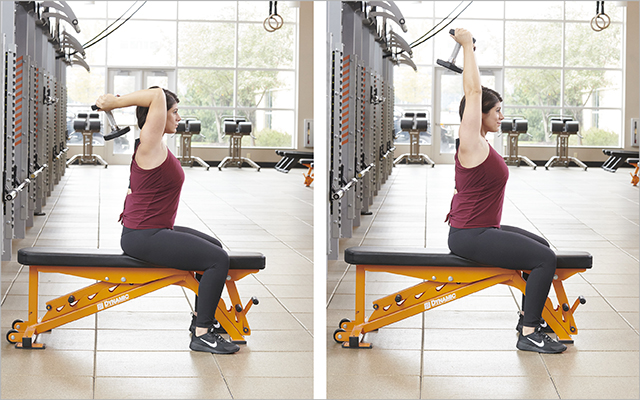 Photos: Kelly Loverud; Styling: Pam Brand; Fitness Model: Maggie Fazeli Fard
- Sit on a bench and hold a dumbbell with both hands under one end, bringing it first to shoulder height, where you can rest it momentarily while you adjust your hands so that you’re able to move the dumbbell to just behind your head and neck.
- Press the weight overhead until your arms are straight.
- Keeping your elbows high and your biceps by your ears, lower the weight behind your head with control.
- Contract your triceps and press the weight to the starting position.
- Repeat.
Day 3: Deadlift Day
A: Barbell Deadlift
 Photos: Kelly Loverud; Styling: Pam Brand; Fitness Model: Maggie Fazeli Fard
- Assuming a shoulder-width stance, feet pointing straight forward or slightly outward, step up to the bar so that your shins are touching the bar. From this point on, the bar should remain in contact with your body. Your shins should be vertical.
- Hinge at the hips and push your butt back as far as you easily can.
- At this point, your hands should be only a few inches from the bar. Bend slightly at the knees until you can grasp the bar.
- With your hands just outside of your legs, grip the bar with a double-overhand grip (both palms facing toward you). This is the grip you will use until the weight is so heavy you feel like your hands will slip off; then you can switch to a mixed grip, if you wish.
- Take a breath.
- Get your chest up — someone across the room should be able to read the front of your shirt.
- Push the floor away and stand up with the weight. Exhale as you stand tall with your shoulders back and your chest up at lockout.
- Note: Your hips should not shoot up before the bar leaves the floor. If the hips move, the bar should move.
For additional form tips, check out “Break It Down: The Deadlift.”
B1: Barbell Good Morning
 Photos: Kelly Loverud; Styling: Pam Brand; Fitness Model: Maggie Fazeli Fard
- Inside of a squat rack, position the bar on your upper traps, just below the bony part of the back of your neck.
- Standing directly under the bar, stand up with the weight, and then, taking small steps, back up until you’ve cleared the hooks.
- Keeping your chest up, hinge your hips backward, keeping the bar tight against your traps.
- When you reach the end of the range of motion — typically indicated by tension in the hamstrings — reverse the movement and stand back up. Repeat.
- Think “wide across the chest; butt back” rather than “bend over.”
B2: Suspension Trainer One-Armed Inverted Row
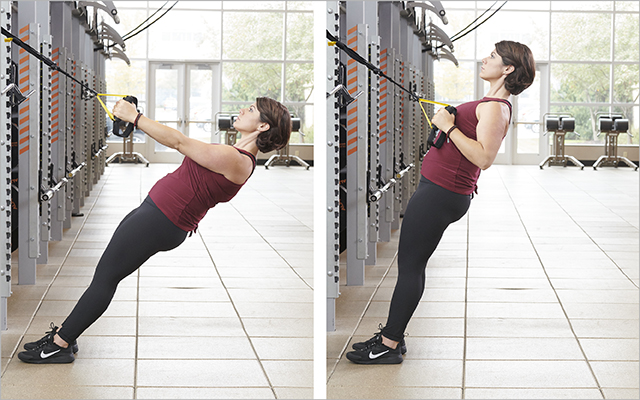 Photos: Kelly Loverud; Styling: Pam Brand; Fitness Model: Maggie Fazeli Fard
- Hold one handle of a suspension trainer with one arm extended and your body directly face-up in a stiff, planklike position.
- Adjust your feet toward or away from the mounting point to create appropriate resistance.
- Pull your body upward as you bring your gripping hand to just outside of your rib cage. Be sure to keep both feet planted and your pulling-side shoulder away from your ear.
- With control, return to the starting position; complete all reps on one side before switching to the other.
- If you are new to this movement, start with your feet far from the anchor point and work your way toward it as you build strength.
B3: Weighted Russian Twist
 Photos: Kelly Loverud; Styling: Pam Brand; Fitness Model: Maggie Fazeli Fard
- Start in a seated position on the floor with your legs bent and your spine tall.
- Holding a weight to your sternum, lean back.
- Rotating through your rib cage and leading with your chest (not your hands or head), move the weight toward your left hip, then over to your right hip. Repeat, counting one rep each time you turn to one hip.
- Challenge the core more by leaning back farther (while still maintaining a tall chest) or elevating your feet to balance on your butt.
This Post Has 0 Comments