

Everyone has pressure-cooker moments. For students, it’s the final exam. For professional athletes, it’s the playoff game. For corporate warriors, it’s the quarterly report and big presentation.
For fitness enthusiasts — and if you’ve made it this far in our Strong, Fast, and Fit program, that’s exactly what you are — it’s the extra-tough workout. This month, you’ll be experiencing plenty of moments that test your newfound fitness and push it to a higher level.
For three of the next four weeks, you’ll do cardio almost every day. Three days a week you’ll also perform strength workouts that are longer and tougher than what you’ve done before. Most weeks, you’ll punch the workout clock six days, for up to 90 minutes at a stretch.
Why the big push now?
“Last month, you took one step back to take two steps forward,” says program designer Troy Jacobson, senior national director of Endurance Sports Training at Life Time.
“Your body should be primed and ready to push to the next level, and it’s time to leverage that recovered state.” (If you missed the previous workouts, visit ELmag.com/strongfastfithome.)
In three weeks you’ll be fitter and stronger than you’ve ever been, ready to tackle a short taper and that final peak in June.
You’ve got this.
Month 5 Overview
| Week | Monday | Tuesday | Wednesday | Thursday | Friday | Saturday | Sunday |
|
17 |
Rest | Strength Workout A; Cardio Workout A (Zones 2-3) |
Cardio Workout A (Zone 2) |
Strength Workout B | Cardio Workout C (Intervals: Zones 3-4) |
Strength Workout A; Cardio Workout A (Zones 2-3) |
Cardio Workout B (Zones 2-4) |
|
18 |
Rest | Strength Workout A; Cardio Workout A (Zones 2-3) |
Cardio Workout A (Zones 2-3) |
Strength Workout B | Cardio Workout C (Intervals: Zones 3-4 and 4-5) |
Strength Workout A; Cardio Workout A (Zones 2-3) |
Cardio Workout B (Zones 2-4) |
|
19 |
Rest | Strength Workout B; Cardio Workout C (Intervals: Zones 3-4 and 4-5) |
Cardio Workout A (Zones 2-3) |
Strength Workout A; Cardio Workout A (Zones 2-3) |
Wildcard Day | Strength Workout B; Cardio Workout C (Intervals: Zones 3-4 and 4-5) |
Cardio Workout A (Zones 2-3) |
|
20 |
Rest | Cardio Workout C (Intervals: Zones 3-4) and 4-5 |
Strength Workout A | Wildcard | Cardio Workout A (Zones 2-3) | Strength Workout B | Cardio Workout B (Zones 2-4) |
Download Image of Month 5 Overview
- This is a tough month — so respect your body. Take the first week of the program to adjust to the new movements, aiming for about 60 to 70 percent intensity during most workouts. Shoot for 70 to 80 percent intensity by the end of Week 2, and 80 to 90 percent by the end of Week 3. A little soreness a day or two after a workout is fine, but debilitating soreness is a sign you need to back off.
- Find your zone. Determine your work zones by calculating your anaerobic threshold (for a DIY method, visit “How to Calculate Your Anaerobic Threshold“) or taking an individualized metabolic test (available at many health clubs). You can also use the RPE (rate of perceived exertion) scale, a subjective effort measurement, as defined at right.
- On rest days, rest. This month, pay close attention to sleep, nutrition, and hydration, and focus on foam rolling, stretching, and other recovery techniques.
- Wildcard day. This is an optional workout day. If you’re feeling strong and energetic, do a light-to-moderate 30- to 45-minute cardio workout. If you’re feeling fatigued, take an extra rest day.
RPE Scale
| Zone | Percentage of Maximum Effort | How It Feels |
| 1 | 50%-60% | Very easy, possible to continue for long periods |
| 2 | 60%-70% | Easy, with light sweating |
| 3 | 70%-80% | Light muscular fatigue, moderate sweating |
| 4 | 80%-90% | Very heavy breathing, high muscular fatigue |
| 5 | 90%-100% | Maximum, all-out effort |
The Workouts
For both strength workouts, do four rounds of each circuit, performing each exercise for 45 seconds. Take a 30-second break between exercises and recover for one minute between rounds.
Strength Workout A
| Circuit 1 | Circuit 2 |
| A. Jump Rope: 45 seconds
B. Pushup: 45 seconds C. Band-Assisted Pull-Up: 45 seconds D. Plank With Leg Lift: 45 seconds |
A. Plyo Jump With 90 With Degree Rotation: 45 seconds
B. Lateral Lunge: 45 seconds C. Burpee Mountain Climber: 45 seconds |
Strength Workout B
| Circuit 1 | Circuit 2 |
| A. Dumbbell Clean and Press: 45 seconds
B. Dumbbell Bent-Over Row: 45 seconds C. Hollow Hold: 45 seconds D. Pushup: 45 seconds |
A. Jump Rope: 45 seconds
B. Plank With Leg Lift: 45 seconds C. Burpee Mountain Climber: 45 seconds |
Cardio Workout A
Perform a cardiovascular exercise you enjoy — running, brisk walking, cycling, swimming, rowing — for 45 minutes, at a steady and challenging but manageable pace (Zones 2 to 3).
Cardio Workout B
Perform a cardiovascular exercise you enjoy for 60 to 75 minutes, at a steady, challenging pace (Zones 2 to 4).
Cardio Workout C
For 10 minutes, perform a cardiovascular exercise you enjoy, slowly elevating your intensity to Zones 3 to 4. Then perform six two-minute intervals in Zones 4 to 5, resting one minute between each interval. Finally, perform four 20-second intervals at your highest intensity, taking one minute and 40 seconds between efforts. When you’re finished, cool down at an easy pace for 10 minutes.
Month 5 Exercises
Jump Rope
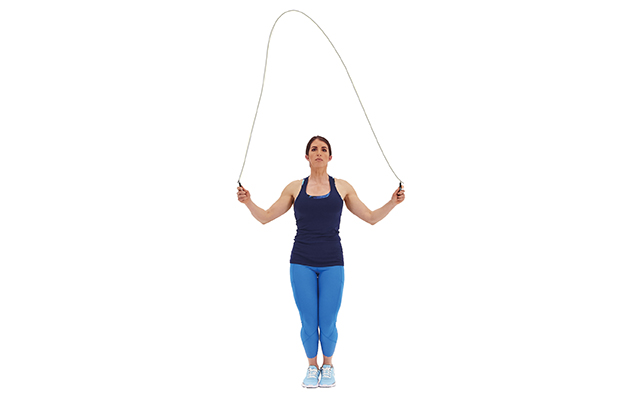
- To select the right rope length, you’ll want the handles to approximately reach your armpits when you stand with both feet on the rope.
- Keep your shoulders relaxed and your grip firm but not overly tight.
- Allow the motion to happen from your wrists and elbows, rather than swinging your entire arm at the shoulder.
- Keep your hands relaxed and close to your body. If your hands move too far out to the sides, it’ll shorten the rope, causing you to trip, and tire out your arms.
- If it’s hard to time your jump to get over the rope without tripping, try listening for the sound of the rope hitting the ground in front of you. When you hear the tap, jump a couple of inches off the ground to clear a way for the rope to pass beneath you.
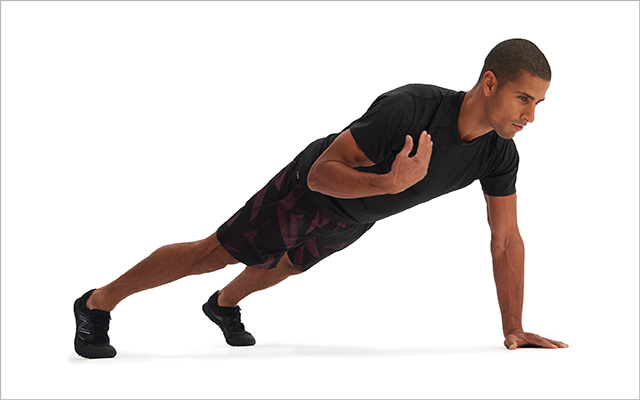
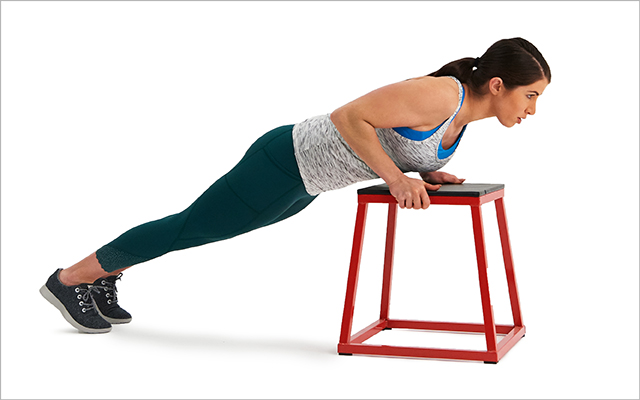
Pushup
- Assume a pushup position — hands and feet slightly wider than shoulder width, hands and the balls of your feet on the floor, arms locked out, and body straight from your heels to the top of your head.
- Keeping your body straight and your head in a neutral position, simultaneously bend your arms and retract your shoulder blades until your chest lightly touches the floor — or as far as possible without losing good form.
- Reverse the movement, pushing yourself back up to the starting position.
- Too tough? Perform the exercise with your hands elevated on a box, table, or bench.
Hands-release variation: Lower your body until your chest makes contact with the floor, lift your hands an inch off the floor for a moment, then press yourself up and repeat. Too difficult? Perform the movement lowering your chest onto an aerobic step or low box.
Band-Assisted Pull-Up
- Loop a thick exercise band — the one that looks like a giant rubber band — over the top of a chin-up bar. Pull the back loop through the front one and pull it tight so that one long loop hangs from the bar.
- Place a chair, box, or bench beneath the chin-up station.
- Stand on the box, pull the exercise band downward, and place your knee through the loop.
- Assume a parallel grip — palms facing each other — on the handles. If a parallel grip is not possible, use an underhand (palms facing you) grip.
- Step off the bench and allow your arms to straighten fully.
- Pull yourself up until your chin clears the bar, pause, and slowly lower yourself back to the starting position. Repeat for the prescribed time period.
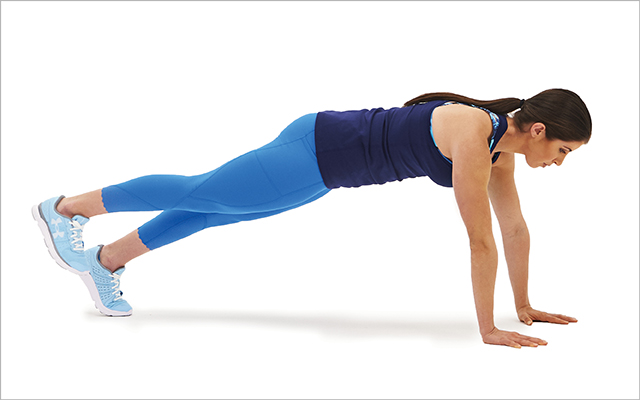
Plank With Leg Lift
- Lie facedown and support your body on your elbows, forearms, and the balls of your feet, bracing your core strongly so that your body forms a straight line from your heels to the top of your head.
- Keeping both legs straight, slowly lift your right leg toward the ceiling about 12 inches, keeping your toes pointed toward the floor the entire time.
- Lower your right leg, repeat the movement with your left leg. Alternate sides for the duration of the interval.
Burpee Mountain Climber
- Assume a shoulder-width, athletic stance.
- Keeping your lower back in its natural arch, bend at the hips and knees and place your hands on the floor.
- Jump your feet backward into the pushup position: feet at shoulder width, body straight from your head to your heels, hands and the balls of your feet on the floor.
- Lift your right foot from the floor and quickly draw your right knee as close as possible toward your chest, then back to pushup position.
- Repeat the move with your left knee.
- Jump your feet forward to a squat position.
- Drop your hips, flatten your back, stand upright, and jump upward.
Plyo Jump With 90-Degree Rotation
- Assume an athletic stance — feet at shoulder width, back straight, gaze forward.
- Bend your knees and swing your arms behind you.
- Swing your arms forward and upward, jumping off the floor as high as possible.
- While in midair, rotate your entire body 90 degrees to the right (so that when you land, you will be facing the wall that was to your right when you started).
- Land softly on the floor and repeat the movement, this time rotating 90 degrees to your left. Alternate sides for the duration of the interval.
Lateral Lunge
- From an athletic stance, step your right foot to the right so your feet are about two shoulder widths apart.
- Extending your arms in front of you for balance, bend your right knee and hip, dropping your weight as far as you can.
- Reverse the movement, stepping back to a shoulder-width stance.
- Repeat the move with your left foot and continue alternating sides for 45 seconds.
- To make the move harder, hold a dumbbell in each hand.
Dumbbell Clean and Press
- Assume an athletic stance — feet at shoulder width, back straight, gaze forward — holding medium-heavy dumbbells at your sides.
- Bend your knees slightly and then “explode” upward (as if attempting to jump straight up in the air), and simultaneously swing the dumbbells to shoulder level, keeping them close to your body as you do so.
- Slowly press the dumbbells to arm’s length overhead.
- Reverse the movement, lowering the dumbbells back to shoulder width and then back to your sides under control.
Hollow Hold
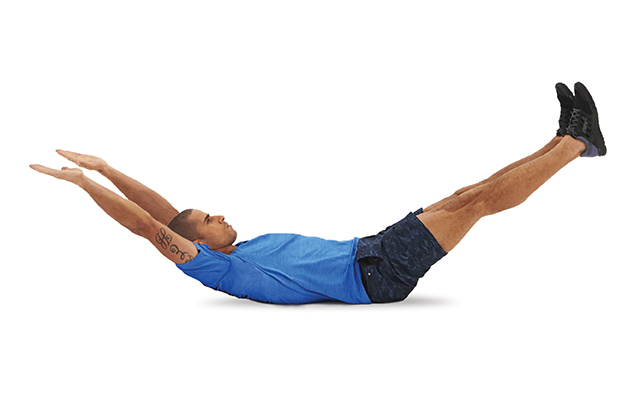 Image by Kelly Loverud
- Lie on your back, knees pulled up toward your chest.
- Press your lower back into the floor and lift your head and upper back a few inches, like you’re doing a crunch.
- Extend your arms overhead and your legs outward, heels and hands hovering about 6 inches from the floor.
- Maintain that position, stopping when your lower back comes off the floor.
Dumbbell Bent-Over Row
- Assume an athletic stance — feet at shoulder width, back straight, gaze forward — holding two medium-heavy dumbbells at midthigh level in front of you.
- Keeping your lower back in its natural arch, bend forward at your hip joints as far as you can, bending your knees slightly as you do so.
- Keeping your torso still, your back straight, and your elbows close to your sides, simultaneously squeeze your shoulder blades together and pull the dumbbells upward as far as you can.
- Hold for a one-count, lower the dumbbells under control, and repeat.
This Post Has 0 Comments