

Navigate to:
⋅ Step-by-Step Power-Clean Form Instructions
⋅ The Power-Clean Video
⋅ The Power-Clean Workout: Reps and Sets
⋅ Do’s and Don’ts
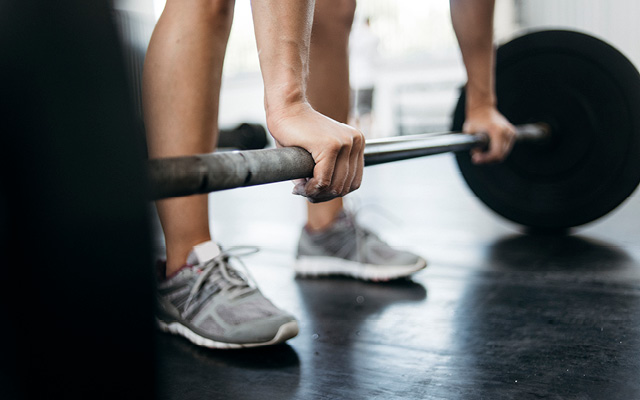
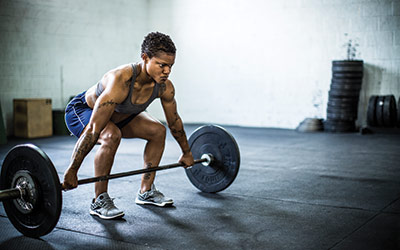
A lifter pulls a weight from the floor, heaves it into the air for a split second, squats beneath it with lightning-fast precision and catches it at shoulder level. The power clean is an impressive sight, but unless you belong to a gym specializing in Olympic weightlifting, it’s a rare one. And that’s too bad, because it’s one of the most functional strength-training movements you can do.
Power-Cleaning Benefits
“Power cleans build not just strength, but full-body power — the ability to move weight quickly,” says Mike Robertson, MS, co-owner of Indianapolis Fitness and Sports Training. That’s essential for athletes’ need to achieve more speed. But anyone can benefit. As Olympic weightlifting coach Mike Burgener puts it, “Anytime you lift something from the floor to your shoulders — whether it’s a barbell, a toolbox or a toddler — you’re doing a version of the power clean.”
Because of its technical demands, the power clean takes more time to learn than the average press or pull-down. Still, says Burgener, “Anyone should be able to do a power clean if they’re smart about it.”
What Is a Power Clean?
There’s a lot going on in that half-second or so it takes to perform a well-executed power clean. Most coaches break that brief, concentrated effort into four distinct phases: the first pull, when you lift the bar from the floor to just above your knees; the transition, when you position yourself to power the weight up, causing a slight re-bend in the knees; the second pull, when you forcefully jump and shrug to get the bar moving upward while moving your elbows up and outward; and the catch, when you pull yourself under the bar and catch it on the fronts of your shoulders, with your elbows pointing straight ahead of you.
Step-by-Step Power-Clean Form Instructions
Master the nuances of each step by working on the practice moves noted below. Use high reps (three sets of 12 to 15) and minimal weight at first (a broomstick works fine), until you’re comfortable with each step. (Even with no weight, you’ll be patterning the movement and improving quickness.) After two to three weeks, start experimenting with lightweight versions of the full movement. (See below for suggestions on how to build up to a power clean with a weight that challenges you.)
As for equipment, stick with the old-fashioned barbell: a regular straight bar at first, and an Olympic bar (with rotating sleeves on the ends) once you’re ready to handle 45 pounds or more. (Ask a personal trainer to help you select a bar.)
Avoid doing power cleans if you’re pregnant or experiencing back pain. And if you’ve had back problems in the past, you should probably stick with hang cleans, beginning the movement with the bar at mid-thigh rather than on the floor (see Step 2, below).
One final note: Always practice high-skill moves like power cleans after thoroughly warming up your ankle, hip, shoulder and oft-neglected wrist joints, and before any other type of exercise. That way, you’re warmed up, but not so gassed you can’t give the exercise your all.
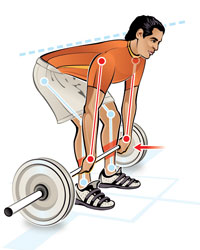
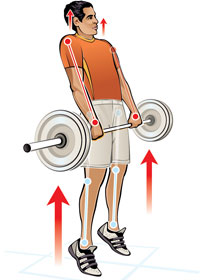
1. The First Pull
 What You’re Doing:
The first pull begins from the moment you lift the bar from the floor and ends when it is just above your knees. Many people assume that the power clean is a fast, explosive motion right from the start — but it’s not. For most people, this part of the lift feels similar to the first phase of the Romanian, or stiff-legged, dead lift: You pull the bar from the floor at a deliberate, but not overly rushed, tempo.
How to Do It:
- Stand behind the barbell, feet parallel and at hip width, shins touching the bar.
- Keeping your arms straight and your lower back in its natural arch, bend your knees slightly and lean forward, pushing your hips back and taking a slightly wider-than-shoulder-width, overhand grip on the bar.
- Lift your chest and look straight ahead, lowering your hips until they are slightly below the level of your shoulders.
- Keeping your elbows locked, shift your weight onto your heels.
- Keeping the weight as close to your body as possible, simultaneously push your knees back, raise your chest, slowly and smoothly drive your hips forward, and lift the bar from the floor point just above your knees.
How to Practice It: Work on nailing your form on the Romanian dead lift, which is a similar movement. Perform all the way to an upright position, making sure to emphasize the chest-up, hips-back starting position.
A Word From the Pros: “Take your time getting set up to lift,” says Burgener. “When your feet are hip-width apart, you get an optimal transfer of power from the floor to the bar. Even in the Olympic Games, 99 percent of missed lifts result from a problem with the stance.”
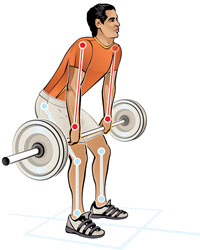
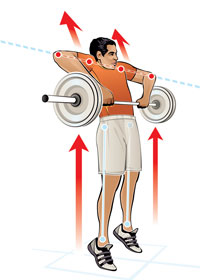
2. The Transition
What You’re Doing:
This brief phase of the lift, also called the mid-thigh hang position, places you in the ideal position to exert maximal upward force on the bar. (This is also the recommended alternative starting position for people who experience lower-back difficulties.)
How to Do It:
- Keeping your gaze forward, your lower back in its natural arch, your arms straight and your shoulders directly over the bar, continue pulling upward until the bar is at the level of your mid-thigh.
- With your weight on your heels, prepare to aggressively push against the ground and extend the hips as if attempting to jump forcefully into the air.
How to Practice It: “It’s best not to practice the transition itself,” says Greg Everett, author of Olympic Weightlifting: A Complete Guide for Athletes & Coaches and owner of Catalyst Athletics in Sunnyvale, Calif., lest you overexaggerate the knee re-bend. “The knees naturally move forward as a product of the hamstrings contracting to extend the hip, so they aren’t ‘re-bending’ so much as momentarily not extending.” In other words, don’t overthink the transition phase: Put yourself in the correct position to enter the second pull, and it will happen on its own. Intentionally shifting the knees forward will diminish the ability to extend the hips with maximal force; shift your balance too far forward and you’ll reduce speed.
A Word From the Pros: Avoid the temptation to bend your arms during the transition phase in order to muscle the bar up to your shoulders, says Burgener. “When the arms bend, the power ends.”
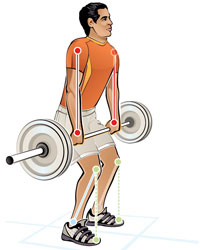
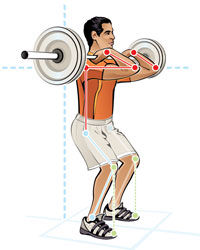
3. The Second Pull
What You’re Doing:
This is the part of the lift when things speed up. Once the bar passes your mid-thigh, it’s an all-out, explosive pull best described as a “jump and shrug” motion. “When you do it right, that bar goes completely weightless for a fraction of a second — I don’t care how much it weighs,” says Burgener.
How to Do It:
- From the transition position, quickly and powerfully thrust your hips forward and upward, straighten your knees, and extend your ankles, as if trying to jump straight up off the floor (you may or may not actually get “air,” but you should try).
- As you feel the bar gain upward momentum, fully shrug your shoulders as quickly as possible, keeping your arms straight.
- As the bar starts to rise, bend and raise your elbows outward as high as possible, keeping the bar close to your body, as if performing a passive version of an upright row exercise. If you’ve done the previous steps correctly, you won’t be actually lifting the bar very much at this point — it will be moving upward on its own.
How to Practice It: The power shrug helps you coordinate the two major parts of the second pull. Starting with the bar at mid-thigh, perform the “jump” movement described above, finishing with a powerful shrug of the shoulders. Allow your arms to bend slightly, and then simply let the bar drop back to the starting position.
A Word From the Pros: “The major mistakes people make on this step are bending the arms too early, allowing the bar to drift too far away from their bodies,” says Robertson. Keep that bar close the entire way up!
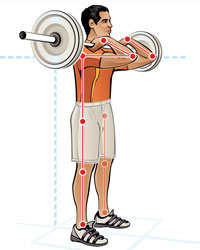
4. The Catch
 What You’re Doing:
This is the most technically demanding portion of the exercise; it’s the phase when you position yourself under the bar as it rises in front of you, catching it on your shoulders.
How to Do It:
- As the bar approaches its maximum height, quickly pull your body underneath it, landing solidly in a quarter- to a half-squat position with your gaze forward and your torso upright.
- At the same time, rotate your elbows forward and under the bar, allowing your grip on the bar to loosen as your wrists turn upward. Catch the bar on the fronts of your shoulders.
- Once the bar feels steady, slowly stand upright.
How to Practice It: Front half- or quarter-squats — partial squats in the “rack” position (bar resting on the fronts of the shoulders, fingertips steadying it in place) — teach you the correct position for receiving the bar: head facing forward, elbows high, torso erect.
A Word From the Pros: “The final step of the power clean should never feel like you’re just dropping downward,” says Burgener. “You’re really actively shrugging and pulling yourself down and under the bar. This segment is about speed, not strength.
“Don’t try to maintain a death-grip on the bar when you perform the catch,” he adds. “You only need your fingertips — and maybe not even all of them — on the bar to steady it in that rack position.”
You may, however, need a little more wrist flexibility to make that position comfortable. Robertson suggests stretching the forearm flexors by bending the wrists backward until you feel a comfortable stretch, pressing them firmly against the floor or a wall, and holding that position for 20 to 30 seconds a few times a day.
Lowering the Bar
Unlike most other strength-training exercises, power cleans don’t really have an eccentric (lowering) phase. In Olympic weightlifting clubs, athletes are encouraged to step back and drop the bar once they’ve successfully “cleaned” it because they have access to specialized rubber plates that won’t damage the floor. Since you’re probably working with straight-up iron, which is a no-go for dropping, just lower your elbows and maneuver the weight to the mid-thigh in a controlled manner. The key to lowering the bar is to allow the hips and knees to bend (always keeping the lower back in a natural arch) and “catch” or “cushion” the bar as it descends. Then lower the bar to the floor as if performing the eccentric, or lowering, phase of a Romanian dead lift.
Watch How to Perform the Power Clean
The Power-Clean Workout: Reps and Sets
So you’ve mastered the practice moves and you’ve more or less locked down your form — what now? One option is to put it all together with a power-clean workout: an entire session based around one super-versatile and effective full-body movement.
- Before you begin, spend 10 minutes warming up your ankle, hip, shoulder and wrist joints with some circling movements and dynamic stretches.
- Rest one to two minutes (more if you need to) between sets of power cleans; one minute between sets of other exercises.
Perform this workout, designed by Level 5 USA Weightlifting coach Mike Burgener, no more than once a week. Increase the weight you use at a rate of no more than 5 pounds per workout.
| Exercise | Sets x Reps |
| Romanian Dead Lift (light weight) | 2 x 5 |
| Front Barbell Half-Squat (light weight) | 2 x 5 |
| Vertical Jump (body weight only) | 2 x 5 |
| Power Shrug (light to medium weight) | 2 x 5 |
| Power Clean (broomstick) | 1 x 5 |
| Power Clean (bar only) | 1 x 3 |
| Power Clean (light weight) | 1 x 3 |
| Power Clean (medium weight) | 6 x 1 |
| Power Clean (medium to heavy weight) | 3 x 1 |
The Do’s and Don’ts of the Power Clean
Do
- Emphasize perfect form, speed and power, rather than the amount of weight you can lift on the movement.
- Keep the bar close to your body as it rises.
- Experiment with sandbag or medicine-ball power cleans.
- Contact a trainer with experience coaching Olympic lifts for expert guidance (ideally a USAW-credentialed Olympic weightlifting coach; search http://www.teamusa.org/USA-Weightlifting/Coaching/Coach-Directory for one near you).
Don’t
- Perform high reps (once you’ve graduated from using a broomstick). Weighted sets should consist of no more than five reps, and never to exhaustion.
- Try to muscle the bar up by performing an upright row movement with the arms. Most of the work in the power clean is performed by the lower body.
- Use a spotter. If a weight is too heavy, simply lower or drop the bar.
This article has been updated. It originally appeared as “Learn to Power Clean” in the April 2011 issue of Experience Life.

This Post Has 0 Comments