

Most muscles in your upper body can benefit from foam rolling, but they’re harder to reach and a little trickier to release than the muscles in your lower back, glutes, and legs. Done right, though, you can safely and comfortably use a foam roller to target back pain, relieve kinks in your shoulders, and soothe overworked biceps and triceps, says Meredith Butulis, DPT, MSPT, NASM-CPT, a physical therapist and instructor at Life Time Academy in Chanhassen, Minn.
The key to foam rolling your upper body is actually to not roll much at all. Instead, use the roller to isolate smaller areas and allow them to release slowly from the pressure of your body’s weight on the roller. As things loosen up, you can wiggle and roll over the foam; if it’s too awkward, you can remain still while reaping the benefits.
The following foam-roller move loosens the musculature of the upper back, alleviating tightness that may contribute to back, shoulder, and neck pain while improving shoulder mobility. (Never foam roll the neck directly; relieving tightness in the shoulders, pecs, and upper back will help release tight neck muscles.)
Butulis notes that foam rolling is appropriate following your warm-up or as part of your cool-down, but the best time depends on which muscles you’re targeting. For preworkout, focus on larger muscles, such as the pectorals. Reserve rolling out smaller muscles or the muscles you plan to recruit in high-strength or power exercises, such as cleans, for postworkout, she advises.
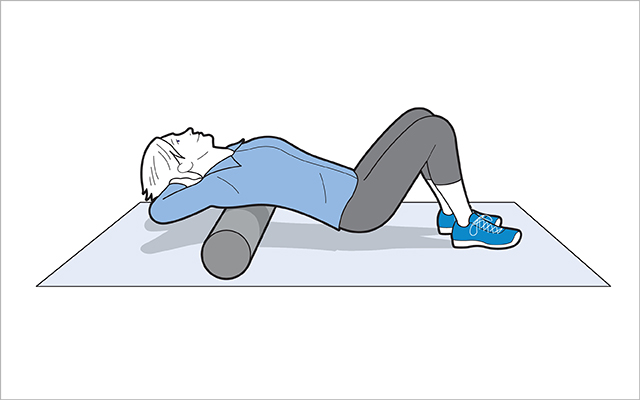
Upper-Back Foam Rolling
Because many routine activities — such as sitting at desks and staring at mobile devices — pull the neck forward and down, exercises that extend the spine help release the neck and upper back while also improving overhead shoulder mobility.
- Lie on the floor; place the roller under your back just below your shoulder blades, perpendicular to your spine.
- Interlock your hands at the base of your skull to support your head.
- Lightly engage your core to support your lower back.
- Hold for 30 seconds and allow the upper back to extend over the roller.
- Shift your hips down toward your feet 1 to 2 inches and repeat with a spot slightly higher.
- Repeat several times, scooting toward your feet and allowing the roller to move up your back.
- When the roller is even with the shoulder-blade area, bring your elbows toward each other to allow more muscle to contact the roller.
Lat/Teres Major Foam Rolling
Repetitive overhead lifting can lead to shoulder impingements. This simple trigger-point release improves shoulder rotation and overhead motion.
- Place the roller in the tight, usually tender, muscular area just behind the back half of the armpit.
- Hold for 30 seconds.
- Repeat on your other side.
How to Use a Foam Roller
- Foam rollers come with varying levels of firmness. Across most brands, the softest rollers are white and the firmest are black. Colored foam rollers (such as blue or orange) fall in the middle.
- Some foam rollers are outfitted with protruding nubs, which add intensity to the experience — avoid these if you’re just starting out or if you have pain.
- If balancing is difficult, use a half-circle foam roller.
- Roll indirectly or directly on tender spots, but steer clear of painful areas — especially if the pain is shooting down an entire limb or is concentrated on a bone.
This article has been updated. It was originally published in the December 2016 issue of Experience Life.

This Post Has 0 Comments