

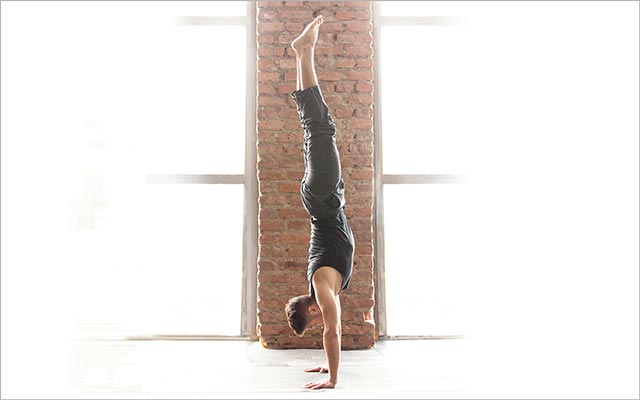
Handstands are one of the most admired and aspirational body-weight exercises. Common in yoga and gymnastics as well as Life Time’s Alpha program, handstand training can improve your full-body strength, balance, coordination, breathing, and spatial awareness.
Though the idea of performing a freestanding handstand might be intimidating at first, you can get upside down in a gradual way — whether kicking up or walking up a wall. Advance at your own pace while focusing on form.
Handstands of all levels demand full-body stability, plus the ability to keep your body stacked — no ribs flaring or back collapsing into a banana shape. They require strength and mobility in the wrists and shoulders, control through the core, and hamstring flexibility.
Handstands also call for a gentle touch. While it’s tempting to kick hard to invert yourself or speed-walk your feet up a wall, focus instead on controlled movements to build skill and power over time.
Remember, the handstand is an advanced move and is best approached with patience and practice. It is worth enlisting the help of a qualified coach who can offer guidance and support; there are also numerous online handstand programs (such as those by Pamela Gagnon of Performance Plus and Kirsty Grosart of Garage Gym Girl).
The tips below can help you get started.
1. Plant your hands shoulder width apart in an active position. Engage through your shoulders, and shift your weight forward.
2. Kick up with control, allowing your hips to line up with your shoulders and hands. Engage your core and extend your legs above you.
Tip: Engage your core to avoid collapsing into a banana-back.
Tip: Straighten your legs, engage your quads and glutes, and point your toes as you reach away from the floor.
3. Find your balance and hold the position only as long as you can maintain great form. Lower your feet back to the floor with control.
4. Active hands are key: Keep your index fingers forward and fingers spread wide, with pressure in your fingertips, the bases of your fingers, and the heels of your hands.
Tip: Lock out your arms, stacking your shoulders over your hands.
Tip: Keep your gaze between your hands.
Build Up the Move
1) Half-Handstand
This variation supports the lower body and is a great way to begin building comfort, awareness, and strength in an inverted position. It is also a wonderful modification for people with tight hamstrings. Set up near, and facing away from, a sturdy box or bench. Position your hands in the active hand position described above. Engaging your shoulders, step your feet up behind you so your toes and the balls of your feet are on the box. With control, practice shifting your weight forward to stack your shoulders over your hands and, eventually, your hips over your shoulders. Engage your core to avoid arching your back and keep your gaze between your hands. Shift your weight back and forth to build comfort, and work on holding the stacked position. As you become comfortable, you can lift your toes, one foot at a time, and even extend your legs, one at a time, over your hips. Don’t forget to point your toes.
2) Kick-Up Handstand
Set up near, and facing toward, a sturdy wall. Plant your hands about 1 foot away from the wall in the active hand position described above. Shift your weight forward and gently kick your feet up, extending your legs using the wall for balance and support. You can adjust your starting distance from the wall, but don’t start so close that you bang your head on the wall or so far that you have to arch your back to reach the wall with your feet. (Remember that the wall is a tool to provide feedback on where you are in space, not to take on your full weight as you collapse into it.) As you gain comfort and strength, lighten the pressure of your feet on the wall; remove them one at a time and practice pointing your toes toward the ceiling as you do.
3) Wall-Walk Handstand
Set up near, and facing away from, a sturdy wall. Plant your hands in the active hand position described above. Engaging your shoulders, step your feet up behind you so your toes and the balls of your feet are pressing into the wall. Move your feet up the wall as you step your hands closer to the base of the wall. Focus on staying engaged and active through your shoulders and core, and don’t allow your back to bend or ribs to stick out as your chest approaches the wall. Aim to hold a vertical, perfectly stacked position. As you gain comfort and strength, lighten the pressure of your feet on the wall; remove them one at a time and practice pointing your toes toward the ceiling as you do.
4) Freestanding Handstand
Find space in a clear, open area, where there aren’t obstacles (including gym equipment and people). Plant your hands in the active hand position described above. Staying strong and engaged through the shoulders, shift your weight forward and begin to kick up with control. Allow your hips to line up with your shoulders and hands. Engage your core and actively extend your legs above you. Once you find your balance, hold for some time to build endurance, but only as long as you can maintain great form.
5) How to Come Out of a Handstand
Being upside down can be frightening and disorienting. It is important to be aware of your skill and endurance, as well as your limitations, to maintain form and avoid staying inverted to the point of failure. Failure, in this case, means collapsing and risking injury, especially to your head and neck. Practice coming out of the handstand variation of your choosing in different ways:
- Lower your feet back the way you came up, lowering them with control if you kicked up to a wall or freestanding handstand or walking them back down with control if you walked up the wall.
- Lower your feet to the left or right, cartwheeling out of the position.
- If you wall-walked or kicked up to a freestanding handstand, you can forward-roll out of the position. Just make sure to practice and gain comfort with forward rolls on their own before trying to do one to get out of a handstand.
Make sure to stay active and engaged through the arms and shoulders until one or both feet are on the ground. Do not try to bail out of a handstand by bending the elbows and letting yourself go.
This Post Has 0 Comments